A cluttered desk kills productivity. Papers pile up, cables tangle, and that stapler you need right now is buried somewhere under last week’s mail. A desk shelf organizer solves this problem by lifting essential items off your work surface and keeping them within arm’s reach. Whether you’re working with a cramped corner desk or a spacious home office, adding vertical storage through shelves reclaims valuable desktop real estate and creates a workspace that actually works. This guide covers what to look for, how to choose the right system, and even how to build your own.
Table of Contents
ToggleKey Takeaways
- A desk shelf organizer reclaims vertical space and keeps frequently used items within arm’s reach, boosting productivity and reducing desktop clutter.
- Choose between tiered desktop organizers for rentals or wall-mounted systems for permanent installations, prioritizing weight capacity at 150% of your storage load.
- Proper ergonomics matter: position a monitor on the bottom shelf at eye level and maintain 4-6 inches of clearance above your seated eye height to prevent neck strain and head bumps.
- Build a basic tiered organizer in a weekend using simple materials like 1×10 and 1×3 boards, wood glue, and sandpaper—a cost-effective alternative to store-bought units.
- Organize shelves by frequency of use, with daily essentials at eye level and archive items lower or higher; use cable ties, small bins, and weekly maintenance to keep your system functional.
What Is a Desk Shelf Organizer and Why You Need One
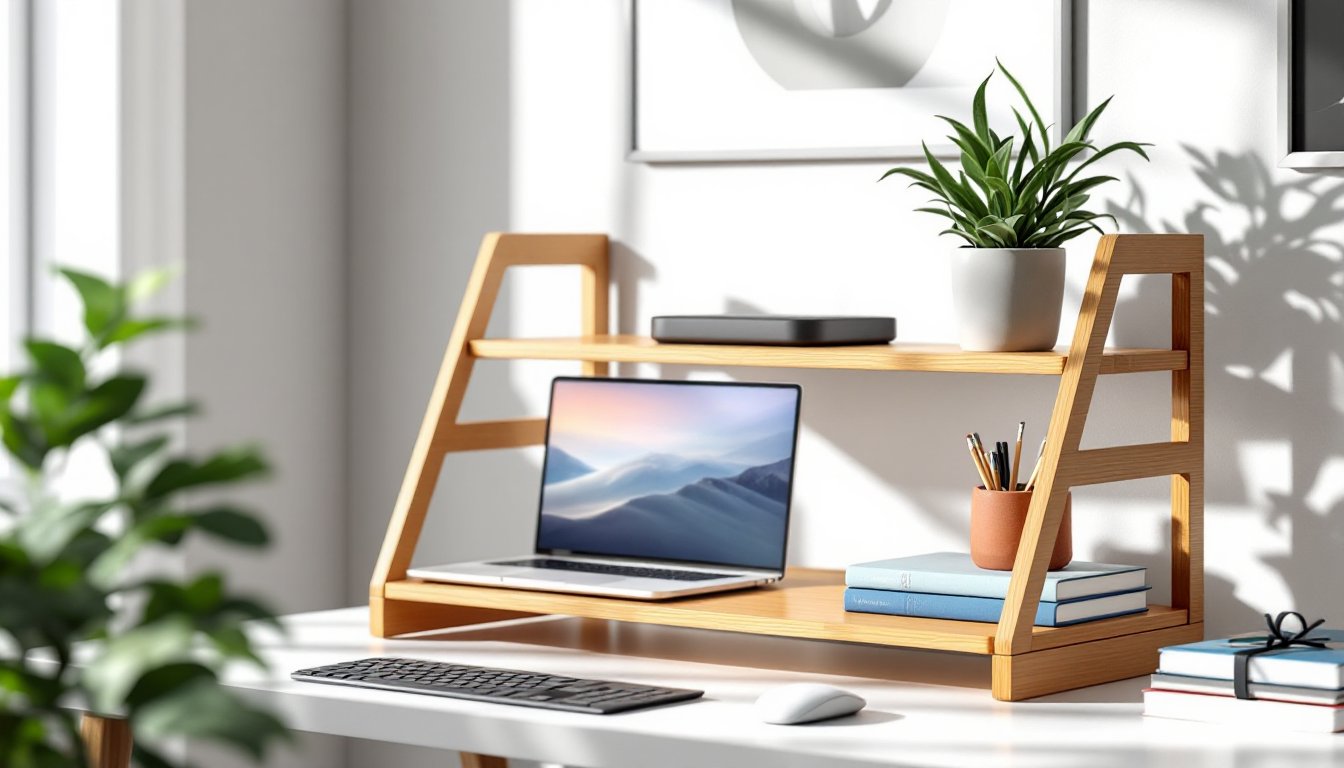
A desk shelf organizer is any shelving unit, freestanding or mounted, that sits on or above your desk to store frequently used items vertically. Think of it as a bookshelf, but scaled down and purpose-built for desktop use. Common materials include wood, metal wire, bamboo, and acrylic.
The main benefit is simple: vertical space is wasted space until you use it. A typical desk has 18-24 inches of clearance between the surface and any overhead shelving or cabinets. A desk topper shelf captures that zone, giving you spots for monitors, books, office supplies, or charging stations without crowding your keyboard.
Beyond storage, these organizers improve ergonomics. Elevating a monitor to eye level (the top third of the screen should align with your seated eye height) reduces neck strain during long work sessions. Many units include a base shelf large enough to hold a monitor or laptop, with upper tiers for accessories.
Safety note: Any shelf system, especially wall-mounted, must be anchored properly. Drywall anchors alone won’t support heavy loads: locate studs using a stud finder and use appropriate wood screws (typically #8 x 2.5-inch for most brackets). If you can’t hit a stud, use toggle bolts rated for at least twice the expected load.
Types of Desk Shelf Organizers for Every Workspace
Tiered Desktop Organizers
Tiered desktop organizers sit directly on your desk and require no mounting. They range from simple two-shelf units to multi-level systems with drawers, file slots, and cubbies. Dimensions vary, but most are 24-36 inches wide, 10-12 inches deep, and 12-18 inches tall.
These are ideal for renters or anyone who doesn’t want to drill into walls. Look for units with a monitor stand base, the bottom platform should be at least 20 inches wide and capable of supporting 30-50 pounds. Check the weight capacity before placing a heavy monitor: cheaper particleboard models may sag over time.
Materials matter. Solid wood or bamboo organizers hold up better than MDF (medium-density fiberboard) or particleboard, especially in humid climates where pressed wood can swell. Metal wire organizers are lightweight and affordable but offer less surface area for stacking items.
Many professionals find organizing smaller accessories in compartmentalized units keeps daily essentials visible and accessible.
Wall-Mounted Shelf Systems
Wall-mounted shelf systems free up your entire desktop by moving storage vertical. Floating shelves, bracket-supported boards, and modular rail systems all fall into this category. Installation requires locating studs (typically spaced 16 or 24 inches on center in residential construction) and mounting brackets or cleats.
For a single floating shelf above your desk, use a French cleat system, a 45-degree beveled strip of wood or metal that locks the shelf to a wall-mounted cleat. This distributes weight evenly and allows easy removal. Cut a 1×4 or 1×6 board at a 45-degree angle along its length using a table saw or circular saw with a guide.
Modular rail systems (like slat walls or pegboard) offer flexibility. Mount a horizontal rail to studs, then add shelves, hooks, or bins as needed. This works well if your storage needs change seasonally or if you share a workspace.
Clearance matters: Position the lowest shelf at least 4-6 inches above your seated eye level to avoid head bumps when leaning back. If you’re mounting above a monitor, leave 2-3 inches of clearance between the screen’s top edge and the shelf bottom.
How to Choose the Right Desk Shelf Organizer for Your Needs
Start by measuring your desk. Width, depth, and the height from desktop to any overhead obstacle (shelf, cabinet, or ceiling) all constrain your options. A shelf for desk use should never overhang the desk’s front edge by more than an inch or two, overhang creates a tip hazard.
Weight capacity is non-negotiable. Add up the weight of everything you plan to store: monitors (5-15 pounds), books (hardcovers average 1-2 pounds each), and office supplies. Then choose a unit rated for at least 150% of that total. Manufacturers often exaggerate capacity, so look for units with solid construction, dovetail or mortise-and-tenon joints for wood, welded corners for metal.
Consider your workflow. If you reference books or binders frequently, opt for deeper shelves (10-12 inches) with vertical dividers to prevent sagging. If you’re storing lightweight items like charging cables or notebooks, shallow shelves (6-8 inches) keep things visible without eating into desk space.
Material selection depends on your environment. Wood looks professional and handles moderate weight well, but it’s heavier and more expensive. Metal wire is lightweight and affordable but can leave indentations on soft surfaces. Bamboo splits the difference, durable, eco-friendly, and mid-priced.
For creative desk organization ideas, mix textures and materials to match your existing furniture, but prioritize function over aesthetics. A wobbly shelf that matches your decor is still a wobbly shelf.
DIY Desk Shelf Organizer Projects You Can Build This Weekend
Building your own desk shelf organizer lets you customize dimensions and finishes to fit your exact setup. Here’s a simple tiered organizer you can complete in 4-6 hours.
Materials:
- One 1×10 board, 6 feet long (actual dimensions: 0.75″ x 9.25″)
- Two 1×3 boards, 6 feet long (actual: 0.75″ x 2.5″)
- Wood glue
- 1.25-inch finish nails or brad nails
- Sandpaper (120 and 220 grit)
- Stain or paint (optional)
- Polyurethane or furniture wax (optional)
Tools:
- Miter saw or circular saw with a straightedge guide
- Drill with pilot bit
- Nail gun (or hammer and nail set)
- Measuring tape
- Speed square
Cut list:
- Two shelves: 24 inches each (from the 1×10)
- Four side supports: 12 inches each (from the 1×3)
- Two vertical dividers: 6 inches each (from the 1×3)
Steps:
-
Cut all pieces. Use a miter saw for clean, square cuts. If using a circular saw, clamp a straightedge guide to prevent drift.
-
Sand everything. Start with 120-grit to knock down rough edges, then finish with 220-grit. Wipe with a damp cloth to remove dust.
-
Assemble the frame. Apply wood glue to the ends of the side supports. Attach them flush to the underside edges of the bottom shelf (24-inch 1×10), forming a rectangular frame. Use a speed square to check for 90-degree corners. Secure with finish nails every 4-6 inches.
-
Add the top shelf. Position the second 24-inch shelf 6 inches above the bottom shelf (measure from the top of the bottom shelf to the underside of the top shelf). Glue and nail the remaining side supports to connect the two shelves.
-
Install dividers. Center the 6-inch dividers between the shelves, creating three compartments. Glue and nail through the top and bottom shelves into the divider edges. Pre-drill pilot holes to prevent splitting.
-
Finish. Apply stain, paint, or leave natural. If finishing, let dry 24 hours, then apply polyurethane or wax for protection.
This basic design holds books, binders, and office supplies. For more detailed plans and variations, free woodworking guides offer step-by-step instructions with cut diagrams.
Safety: Wear safety glasses when cutting and nailing. Use a dust mask if sanding indoors. Work in a well-ventilated area if applying stain or finish.
Organizing Your Desk Shelf for Maximum Productivity
A shelf organizer only works if you use it intentionally. Start by sorting everything on your desk into three categories: daily use, weekly use, and archive. Daily items, pens, notepads, charging cables, belong on the most accessible shelf, typically eye level or just below. Weekly items like reference books or project files go on upper or lower shelves. Archive anything you haven’t touched in a month.
Zone your shelves. Dedicate one section to tech (chargers, headphones, external drives), another to writing tools, and a third to reference materials. Use small bins, drawer organizers, or even repurposed food containers to corral loose items like paper clips, USB drives, or sticky notes.
Cable management is critical. Velcro cable ties or adhesive clips keep charging cables from sliding off shelves and tangling. Route cables along the back edge of shelves or down a rear leg if your organizer has one.
Weight distribution prevents tipping. Place heavier items (monitors, large books) on lower shelves and toward the back. Light items (notebooks, small bins) go up top.
Maintenance: Spend five minutes at the end of each week resetting your organizer. Return items to their zones, wipe down surfaces, and remove anything that doesn’t belong. Dust accumulates fast on horizontal surfaces, especially near keyboards and air vents, so keep a microfiber cloth nearby.
If your organizer starts to feel cluttered again, reevaluate. You may need additional storage, or you might be holding onto items you don’t actually need within arm’s reach. The goal is a workspace where everything has a place and nothing competes for attention.